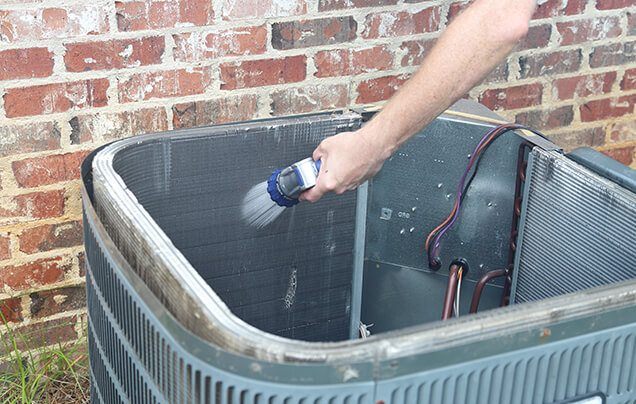
Cleaning an air conditioning unit is a delicate process. It’s almost surgical in nature. You don’t want to be heavy-handed when handling the machine. It can cause mechanical damage that’s easily a few hundred dollars in repair or replacement costs. But it doesn’t have to be overwhelming, either. With regular practice, dextrous hands, and the guide below, you can clean your AC unit safely and efficiently. So without further ado, here is a step-by-step guide on how to clean your air conditioner.
Cut Off Power to Your AC Unit
You don’t want to work on a running AC unit as it can lead to both bodily injury and mechanical damage. But simply switching off the thermostat won’t do. You’ll want to cut off the power supply from the main electrical panel. Go to the circuit breaker in your home and locate the switch or button where your AC unit is connected to and turn it off. If you cannot find your circuit breaker, it’s usually located in low-traffic areas of the home, such as the attic, basement, garage, or closet. If you’re living in an apartment unit, you might find it on the sidewall of your laundry area.
Know What You’re Working On
There are two main components that make up an air conditioning unit: the interior and the exterior portion. You’ll want to familiarize yourself with each component to better understand how your AC unit works. Moreover, it’ll help you easily follow whichever AC-related resource you use. One of the key things to know about these two components is that they each hold a coil, which will require routine cleaning. These two coils are your evaporator coil and your condenser coil.
Clean Your Condenser Coil
You’ll need to buy a coil cleaner from your local home improvement store. It’s important to remember that coil cleaners are extremely corrosive and can cause skin burns if handled improperly. The fumes are also highly toxic. Wear gloves and a protective mask when handling it. Make sure not to use the solution on your interior coils, either, as this can corrode the evaporator coil. Pour the solution into a pump sprayer and spray it into the condenser coils. Let it settle for a few minutes, and then rinse it off with a hose.
Clean the AC Fins
Since you’re already doing work on the condenser, you might as well clean the fins next. The fins help move heat away from the AC so that heat disperses faster. You can clean your AC’s condenser fins with a specialized fin comb. It’s a small device with soft bristles designed for delicately cleaning both the condenser fins and evaporator fins. In addition to cleaning the fins, the comb can also straighten out any bent fins that are restricting airflow.
Clean Your AC Filter
Most central AC units have filters that are intended to be replaced rather than washed after some time. If you decide to clean your AC’s filter, check your owner’s manual to see if it’s an actual option. How you’ll remove the filter for cleaning will also vary by the AC model you own. The steps for cleaning it, however, are essentially the same. Vacuum the filter, and soak it in room temperature water. Then, spray it with equal parts vinegar and water solution and air dry it.
Clear Your AC’s Surroundings
You’ll want to make sure the area surrounding your AC is entirely free of any blockage within a 2-foot radius, at least. Don’t place any patio furniture, potted plants, yard equipment, or any other object near it. You’ll also want to replace the fan cage and secure a new one using the screws you took out prior.
Level the AC Unit
Dirt and debris may settle beneath the AC and lead to tipping. If a condenser unit is left unaligned for a protracted period of time, it can lead to major repairs later on. If you do identify misalignment, you can use shims to level the AC and prevent it from tipping.
Move to the Interior Portion of Your AC
Now it’s time to move on to the interior portion of your AC unit. The evaporator coil is a copper coil that is responsible for absorbing the heat as hot air passes above them. Use a soft brush to wipe the dust off the coil. The dust is usually made up of whatever particles linger around your home, such as skin cells and pollen. To avoid an allergic reaction, wear a protective mask. You can then proceed to open the access panel by loosening the screws.
Wash the AC Evaporator Coil
As mentioned earlier, you do not want to use the same coil cleaning solution that you used on the condenser coil as it is highly acidic and can corrode your evaporator coil. The ideal cleaning solution for your evaporator coil is a no-rinse solution that you can also buy from a local home improvement store. Spray the solution onto the coil as well as the small surrounding areas that your hand can’t reach. The solution froths up and then drains into the unit’s drain pan.
Clear Out the Drain
This step is more optional than necessary. Observe how quickly your cleaning solution empties into the drain when you pour it out. If it’s slow or if it doesn’t even drain, it means there is a blockage. If you do not regularly clean or maintain the drain, mold and algae can grow in it. And since the drainpipe is usually a PVC line that’s roughly an inch wide, it can get clogged up fairly quickly.
Close the Panel and Reconnect Your AC
With all parts rinsed and dried, close the access panel using the screws you took out earlier. If the unit has an HVAC metal foil tape, use it to completely close the top and bottom parts of the access panel. Avoid covering up the manufacturer’s label as an HVAC technician may need access to it in the future. Go to your circuit breaker and turn the switch or button connected to your AC unit back on.
Contact Us Today
Thoroughly cleaning an AC unit may require professional hands, special equipment, and hours of practice. It’s a delicate procedure that, if not managed properly, can cause more harm than good to your AC unit. A professional HVAC technician, like the ones at Polar Air & Heating, Inc., can do routine cleaning and maintenance work on your AC unit at affordable rates.
We also offer service agreement plans, so you get the maximum performance out of your equipment, lower total service costs, and a two-year warranty on repairs. If you’re in the Las Vegas, NV, region and need HVAC help, give us a call today or submit a form through our website! We’re available 24/7 for inquiries and emergency services, and we’d love to help you with anything you need.


